
We'll be using a Creative Commons model by artist Nobiax that can be downloaded by clicking the Download File button on this page. The file is a ZIP archive that can be unpacked to reveal color, specular, and normal maps, in addition to the 3D model itself.
The Model
In Unity, open the Assets menu and then select the Import New Asset command.

Find the plastic_barrel.obj file from the unpacked ZIP file and double-click it.
Drag the plastic_barrel object from the Project panel into the viewport to create an instance of the object in your scene.

The Texture
Again select the Import New Asset command as we had done to import the model, but this time choose the diffus.png file.
Select the plastic_barrel-plastic_barrelmat entry from the Project panel, and with that still selected, drag the diffuse image into the Base slot as shown below.

The Normal Map
To open up slots for the additional material channels, click the Shader dropdown in the Inspector panel, and select Bumped Specular.

Import the normal.png file following the example of the last few steps. Then drag it into the Bumpmap slot of the material.

The normal map has loaded in, but there's something strange about that shading when the viewport is rotated. Additional clues that something has gone amiss can be found by comparing our version with the artist's original depiction.

The trouble comes from there being two prevalent normal map conventions, each of which interprets the green channel of the normal map in the opposite way. In this case the artist and Unity happen to use different normal map conventions.
The normal map can be fixed by flipping its green channel. This is a job that can be done in most image editors, but we'll do it in Genetica. Genetica is nice for these kinds of jobs because each action taken is represented visually by a node. The node graph can then be saved for easy reuse if we ever need to manipulate a future image in the same way, or if we simply want a reminder of exactly what was done to the image. Download Genetica here.
In Genetica, start a new document and drag an Imported Image node into the empty slot in the middle of the workspace. In the dialog that pops up select the normal.png file

Next drag an Invert node onto the Imported Image node, and then select Insert Below in the little menu that pops up.

We only want to invert the green channel of the normal map, so set the Invert node's Affect Red and Affect Blue properties to No.

We want to recolor the individual pixels of the normal map without resampling the image in any way, so make sure the Anti-Alias button is not pushed, and that the render resolution is set identically to the original image that was imported into Genetica (1024 x 1024 in this case). Then render the image and export it as a PNG file named "normal inverted".

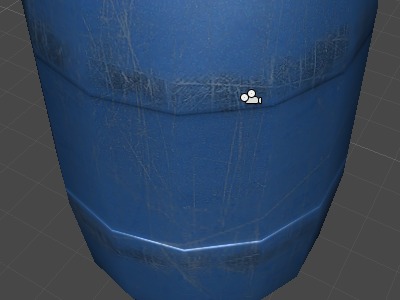
Import the inverted normal map and apply it to the model in the usual way.

The middle strip of the barrel is now indented as expected.
The Specular Map
The artist has also supplied a specular map, but there's no image slot to import it into our material in Unity. The label "Gloss (A)" is our clue that Unity is looking for the specular data in the alpha channel of our main color map. Because the artist has supplied the specular information in a separate image, we must combine them in Genetica.

Start a new document in Genetica and then drag an A + B node into the empty slot. This node can be found in the Combine category of the Library panel. Then insert an Imported Image node into each of the A + B's two empty inputs. In the first Imported Image load diffus.png, and in the second one load specular.png.

Drag a Colorize node over the second Imported Image, and select Insert Below in the little menu that pops up. Then click the Edit button appearing in the properties panel.

Delete the two color handles on the gradient by selecting each one and tapping the delete key on your keyboard.

Then create two handles on the transparency bar. Drag one handle to the leftmost position and give it a maximum value. Drag the other handle to the rightmost position and set it to zero. Close the dialog by clicking OK.

The color and specular maps are now properly combined into a single image. Don't worry about the combined map looking semi-transparent. Unity won't make the barrel transparent, but instead will interpret the transparency as glossiness or specularity.

Back in Unity, import our combined map and apply it to our material. Also make the Main Color and Specular Color properties of the material pure white in order to increase the vibrancy of the material.

The model and its material channels have now been successfully imported into Unity. Woo!

great tutorial! it helps me a lot)
ReplyDelete